Oct
Exploring the Salesforce Einstein Vision API

Einstein Vision includes these APIs:
- Einstein Image Classification—Enables developers to train deep learning models to recognize and classify images at scale.
- Einstein Object Detection (Pilot)—Enables developers to train models to recognize and count multiple distinct objects within an image, providing granular details like the size and location of each object.
How Einstein Vision Works?
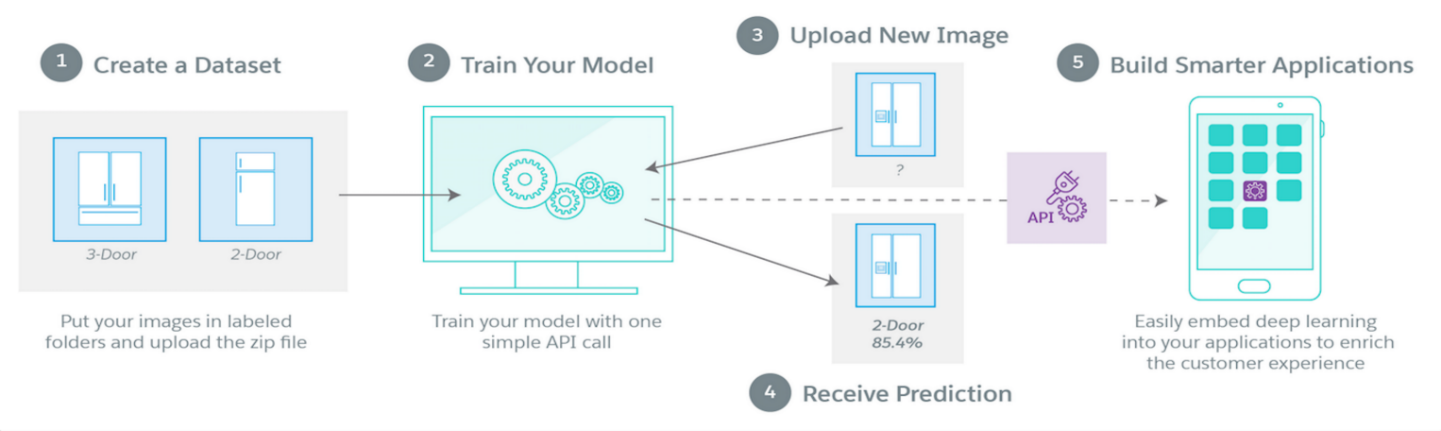
- First, the customer collects images of what they’d like to classify.
Then they create a dataset using the Einstein Vision API, which holds all of the images used to train the model. - The most important elements of a dataset are labels. Think of a label as a category. Every image that a customer wants to identify falls within a specified label.
- Once the customer has collected sufficient images, they train the dataset, and the output is a trained model.
- Images can be validated from different data sources, such as a file or URL, against this model. For every check, the identified labels and probability values are returned.
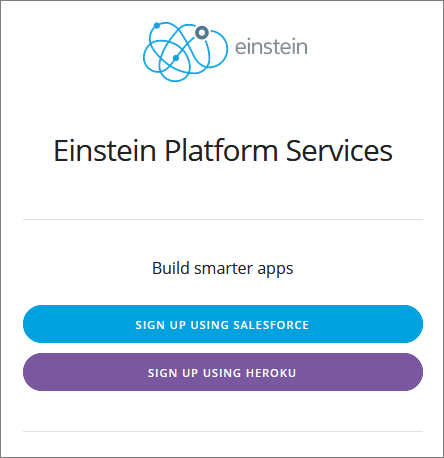
 What You Need to Call the API Before you can access the Einstein Platform Services APIs, you first create an account and download your key. Then you use your key to generate an OAuth token. You can use your key to access both the Einstein Vision and Einstein Language APIs. 1. Get an Einstein Platform Services Account
- From a browser, navigate to the sign up page.
- Click Sign Up Using Salesforce.
 3. On the Salesforce login page, type your username and password, and click Log In. If you’re already logged in to Salesforce, you won’t see this page and you can skip to next step.
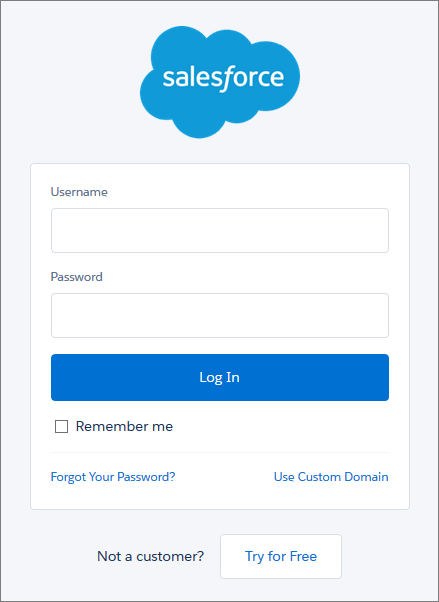 4. Click Allow so the page can access basic information, such as your email address, and perform requests.
 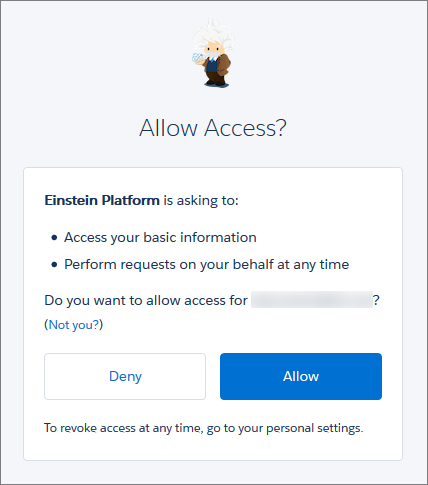 5. On the activation page:
- If you’re using Chrome, click Download Key to save the key locally. The key file is named pem.
- If you’re using any other browser, cut and paste your key from the browser into a text file and save it as pem.

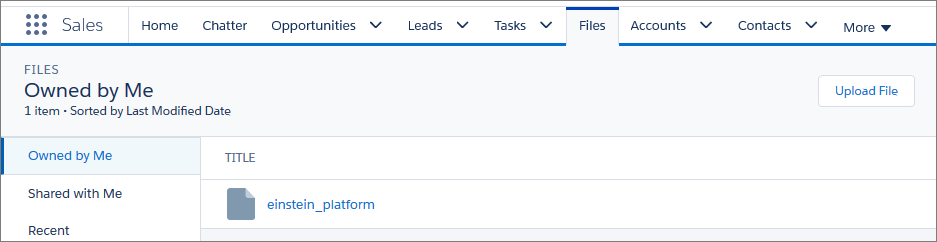
2. Upload Your Key You must upload your key to Salesforce Files so that the Apex controller class can access it.
- Log in to Salesforce.
- Click Files.
- Click Upload File.
- Navigate to the directory where you saved the pem file, select the file, and click Open. You should see the key file in the list of files owned by you.
 3. Get the Code: Image Prediction using General Image Classifier Now that you’ve uploaded your key, get the code from GitHub.
These steps show you how to download the code to your local machine.
- From your browser, navigate to https://github.com/salesforceidentity/jwt.
- Click Clone or download.
- Select Download ZIP to download the classes that handle the JWT token processing.
- If prompted by your browser, click OK to save the jwt-master.zip file locally.
- Navigate to https://github.com/MetaMind/apex-utils.
- Click Clone or download.
- Select Download ZIP to download the code for the Apex classes and the Visualforce page. These code elements call the Einstein Vision API.
- If prompted by your browser, click OK to save the apex-utils-master.zip file locally.
- From your file explorer, navigate to the folder where you saved the .zip files and extract each file. Make a note of where you extract the code because you use it later on to create the classes.
If you have a GitHub account and you have git installed, you can download the code by using these commands from the command line.
- Clone the JWT repo by using this command.
git clone https://github.com/salesforceidentity/jwt - Clone the Apex code repo by using this command.
git clone https://github.com/MetaMind/apex-utils
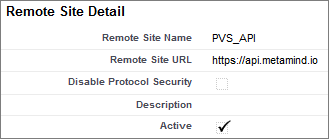
4. Create a Remote Site Before your Apex code can call the Einstein Vision endpoint, you must register the endpoint URL in the Remote Site Settings page.
- Log in to Salesforce.
- From Setup, enter Remote Site in the Quick Find box, then select Remote Site Settings.
- Click New Remote Site.
- For Remote Site Name, type PVS_API.
- For Remote Site URL, type https://api.metamind.io.
- Click Save.
Create the Apex Classes In this step, you create the Apex classes that call the API and do all of the heavy lifting.
- In Salesforce, from Setup, enter Apex Classes in the Quick Find box, then select Apex Classes.
- Click New.
- To create the JWT Apex class, copy all the code from apex into the Apex Class tab and click Save.
- To create the JWTBearerFlow Apex class, copy all the code from apex to the new Apex Class tab and click Save.
- To create the HttpFormBuilder Apex class, copy all the code from apex into the new Apex Class tab and click Save.
- To create the Vision Apex class, copy all the code from Vision.apex into the new Apex Class tab and click Save.
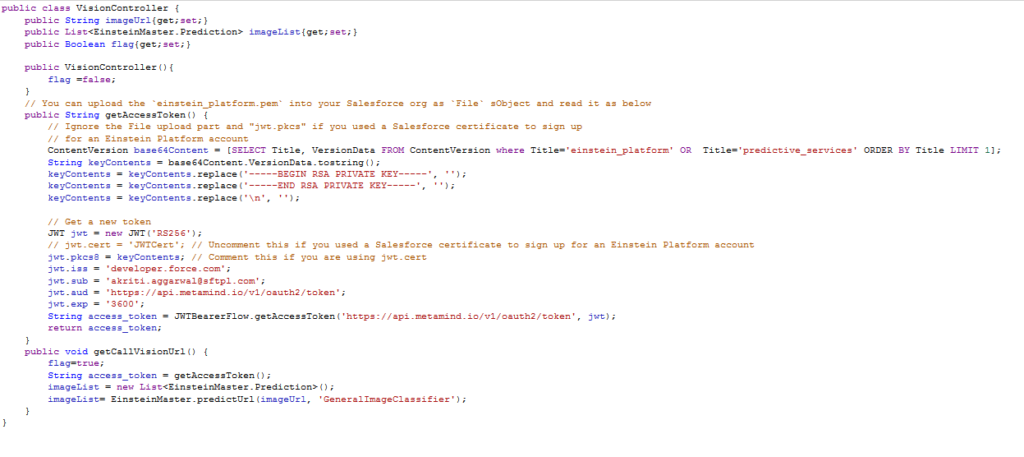
- To create the VisionController Apex class, Copy the VisionController code from the apex-utils md into the new Apex Class tab. This class is all the code from public class VisionController { to the closing brace }. In this example, the expiration is one hour (3600 seconds).
- Update the sub placeholder text of yourname@example.com with your email address. Use your email address that’s contained in the Salesforce org you logged in to when you created an account. Be sure to use your email address and not your Salesforce username.
- Click Save.
Create the Visualforce Page Now you create a Visualforce page that calls the classes that you just created to make a prediction.
- In Salesforce, from Setup, enter Visualforce in the Quick Find box, then select Visualforce Pages.
- Click New.
- Enter a label and name of your choice.
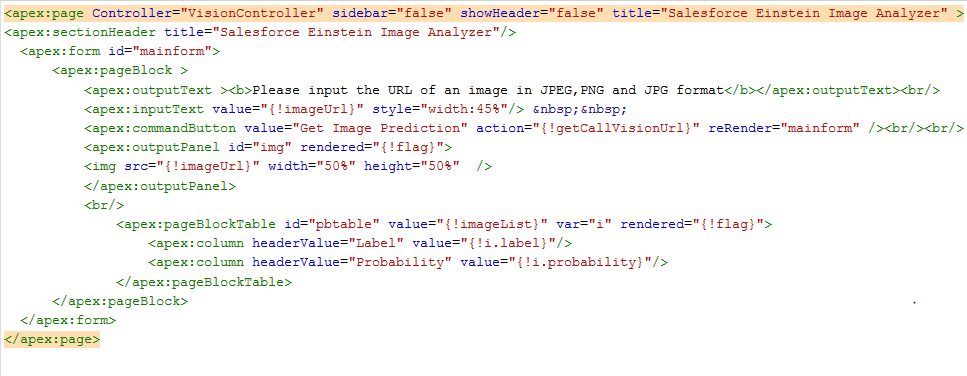
- Click Save.
- Click Preview to test out the page.
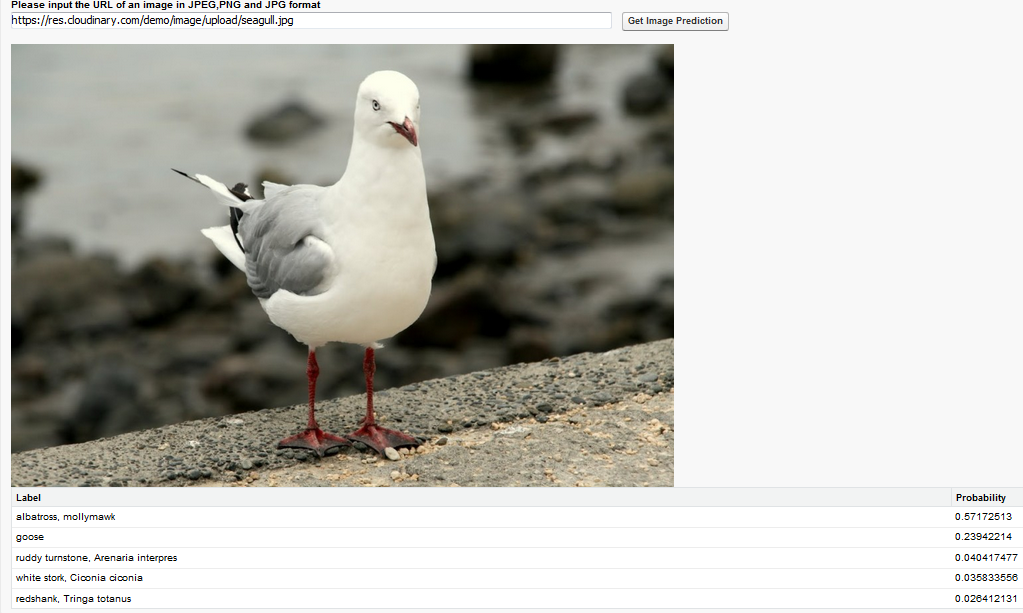
Your page shows the prediction results from the General Image Classifier, and the classifier is sure it’s a picture of a albatross.
There are different prebuilt classifiers that you can use instead of general image classifier: Food Image Model This model is used to classify different foods and contains over 500 labels. You classify an image against this model just as you would a custom model; but instead of using the modelId of the custom model, you specify a modelId of FoodImageClassifier Scene Image Model This model is used to classify a variety of indoor and outdoor scenes. You can classify an image against this model just as you would a custom model; but instead of using the modelId of the custom model, you specify a modelId of SceneClassifier. Multi-Label Image Model This multi-label model is used to classify a variety of objects. You can classify an image against this model just as you would a custom model; but instead of using the modelId of the custom model, you specify a modelId of MultiLabelImageClassifier Sentiment Analysis What is Sentiment Analysis: Sentiment analysis is extremely useful us to gain an overview of the public opinion behind certain topics and feedbacks. Automatically classifying text by sentiment allows you to easily find out the general opinions of people in your area of interest. For example, you might want to analyse reviews of a product to help you improve the customer experience, or to find the most or least popular product. How can we get this? About HavenOnDemand Sentiment Analysis API: The Sentiment Analysis API analyses text to return the sentiment as positive, negative, neutral, or mixed. It contains a dictionary of positive and negative words of different types and defines patterns that describe how to combine these words to form positive and negative phrases. Implementation-
- Get API key from HavenOnDemand:
- Go https://dev.havenondemand.com/ and register yourself.
- After registration, Go https://www.havenondemand.com/account/api-keys.html.
- Then click on Generate Key button. Here you will get a popup for the name of the key. Fill this and click on Continue.
- You will see a key here. Copy this key and save it on your computer. we need this on salesforce apex code.
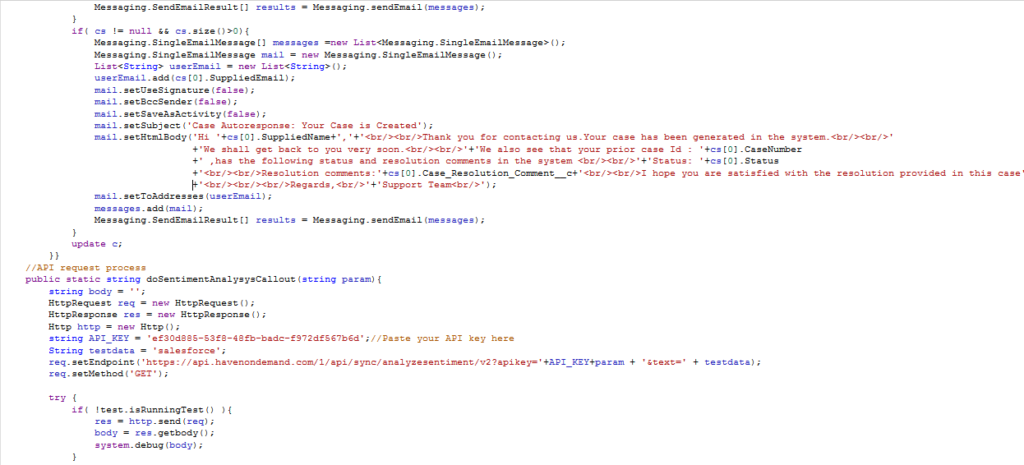
API Explanation: We need to send request on https://api.havenondemand.com/1/api/sync/analyzesentiment/v2
It is GET call. So you need to pass 2 params in URL -apikey = Your API key-text = set the text for sentiment analysis.
- Now create an Email Services:
- Go to Setup –> Develop –> Email Services
- Create Email Service here as below Email Service Name = SentimentAnalysis Apex Class = Email Handler Active = Checked (It should be checked to get inbound emails.)
- After that create new Email Addresses under Email Service.
Setting Up On-Demand Email-to-Case The following high-level steps outline how to set up On-Demand Email-to-Case:
- Determine the email routing addresses that your customers can use to submit cases to your support team. Emails are automatically converted to cases based on the settings specified for each routing address.
- In Salesforce enable Email-to-Case and configure your email routing addresses.
You need to add a new email routing address, verify the new email routing address, and enable Email-to-Case:
Click Setup ➤ Customize ➤ Cases ➤ Email-to-Case.
- From the Routing Addresses related list, click the ‘New’ button to create a new Routing Address. A routing address is activated after Email-to-Case is enabled.
- Enter the routing address settings and click on Save.
- Check the inbox for that Routing Address to verify the email address
- Configure your email system to forward case submissions to the email services address provided to you by Salesforce. This step varies depending on what email client do you use.
- Test your email routing addresses:
- Manually send emails to the routing addresses.
- Verify that the emails convert to cases based on their routing address settings.
- Add the email address that you configured to your company’s support website. This is the email address customers can use to submit cases to your support team
Copy Code Class -1 : SentimentAnalysisJsonApex //Deserialize the data coming in response from user via email into JSON format 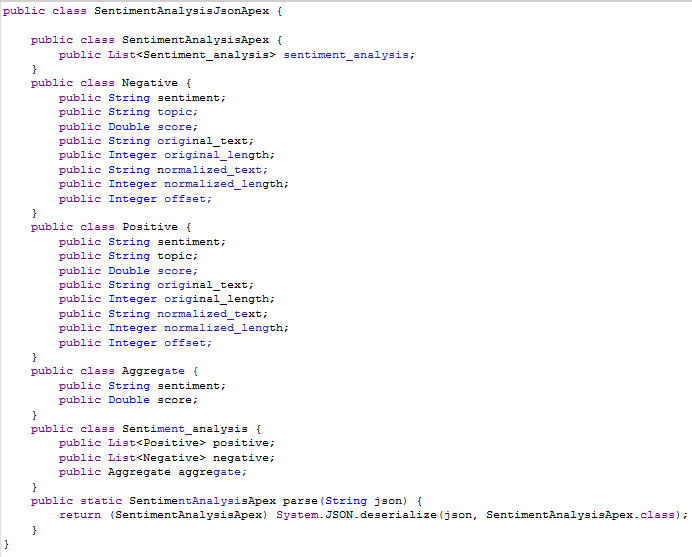 Class-2: ObjectTriggerHandler //Make Http callout to HaveOnDemand tool and sends response
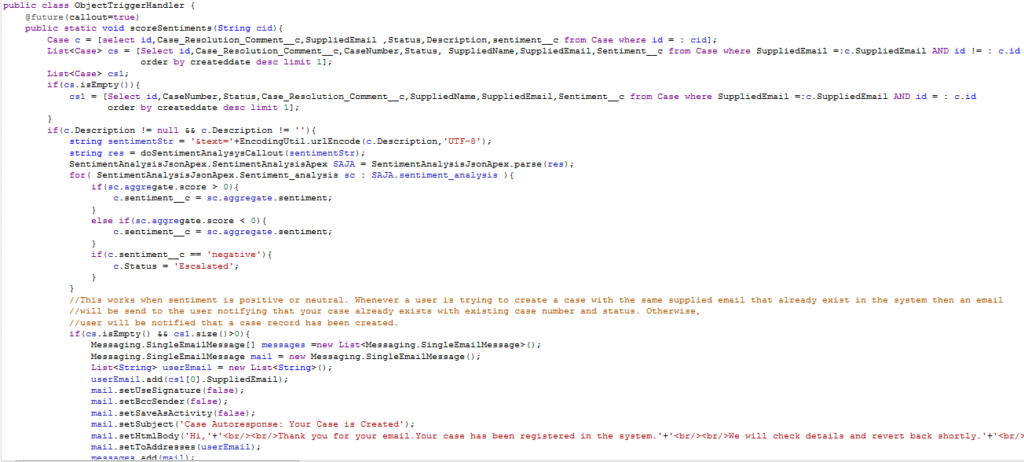
 Trigger-1: CaseSentiment //Making callouts via trigger and update status to ‘Escalated’ when sentiment value comes as ‘Negative’ and to send email whenever a new case is created or any existed case with the same supplied email already exist in the system.
 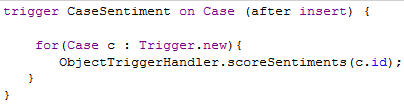 Escalation mail to user CONDITION: When Sentiment is ‘Negative’ and status is ‘Escalated’ STEPS TO CREATE ESCALATION RULE:
- From Setup, enter Escalation Rules in the Quick Find box, then select Escalation Rules.
- Create the escalation rule.
- Click New and name the rule. Specify whether you want this rule to be the active escalation rule.
- Click Save.
- On the Case Escalation Rules page, select the rule that you want to work with.The rule detail page is displayed.
- Create the rule entries. Rule entries define the criteria used to escalate the case.
- In the Rule Entries section, click New. For each rule entry, you can specify:
- Order in which rule entries are evaluated.
- Criteria for escalating a case
- How business hours affect when cases escalate
- How escalation times are determined
- Click Save.
- The Escalation Actions page is displayed. Define the escalation actions. Escalation actions specify when the case escalates and what happens when the case escalates. You can add up to five actions for each rule entry to escalate the case over increasing periods of time.
- In the Escalation Actions section, click New. For each escalation action, you can:
- Specify when the case escalates: In the Age Over field, enter the number of hours after which a case escalates if it hasn’t been closed. You can enter the number of hours and either 0 minutes or 30 minutes. For example, 1 hour and 0 minutes or 1 hour and 30 minutes.
- Reassign the case to another user or queue.
- Send notification emails to other users, the current case owner, or other recipients(optional)
- Click Save.
Now search “Email-to-case” in quick find box from setup, click on it and you will see routing address table like this:  Send an email to the email id shown under email service address and that will create your case record with the sentiments. Intent Analysis Creating your own Classifier: Install cURL We’ll be using the cURL command line tool throughout the following steps. This tool is installed by default on Linux and OSX. If you don’t already have it installed, download it from https://curl.haxx.se/download.html Step 1: Define your classes and gather data In this step, you define the labels that you want the model to output when text is sent into the model for prediction. Then you gather text data for each of those labels, and that text is used to create a model.
Here is a case routing http://einstein.ai/text/case_roung_intent.csv file that you can use.
The labels in the case routing dataset define the intent behind the text. The intent can then be used to route that case to the right department. Those labels are:
- Billing
- Order Change
- Password Help
- Sales Opportunity
- Shipping Info
Step 2: Create the dataset You will use the data that you have gathered to create a dataset. In the following command, replace <TOKEN> with your JWT token and run the command.
So, now question is how you will get your JWT token?
The Einstein Platform Services APIs use OAuth 2.0 JWT bearer token flow for authorization. Use the token page to upload your key file and generate a JWT token.
These are the following steps that will help you in generating a token –
- Type your email address or account ID.
- If you signed up using Salesforce, use the email address associated with your user in the Salesforce org you logged in to when you signed up.
- If you signed up using Heroku, use the account ID contained in the EINSTEIN_VISION_ACCOUNT_ID config variable.
- Click Browse and navigate to the pem file that you downloaded when you signed up for an account.
- Set the number of minutes after which the token expires.
- Click Get Token. You can now cut and paste the JWT token from the page.
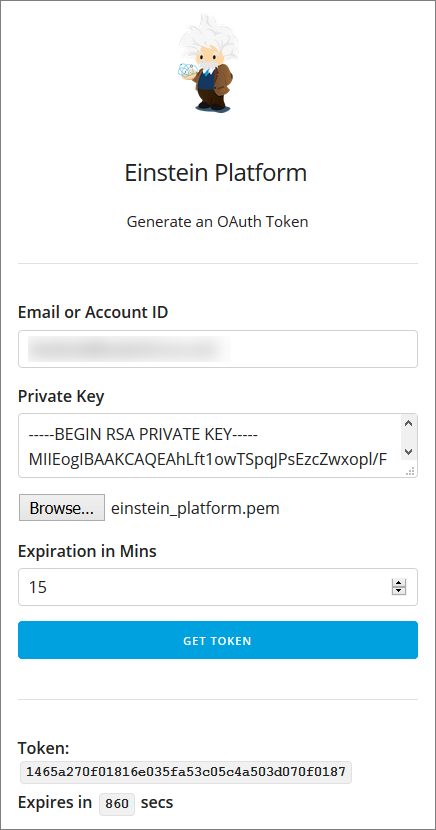
This page gives you a quick way to generate a token. In your app, you’ll need to add the code that creates an assertion and then calls the API to generate a token. cURL  This command:
- Creates a dataset called case_routing_intent from the specified .csv file by accessing the file via a URL
- Creates five labels as specified in the .csv file
- Creates 150 examples
This call is asynchronous, so the response looks like this JSON. 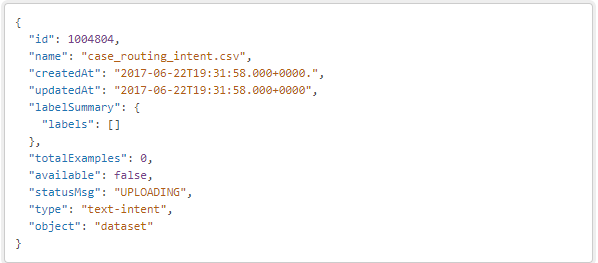 To verify that the data has been loaded, make a call to get the dataset. Replace <TOKEN> with your JWT token and <DATASET_ID> with ID of the dataset you created. cURL
  The results look something like this JSON. You know the dataset is ready when available is true and statusMsg is SUCCEEDED.
  Step 3: Train the dataset to create the model Use this cURL command to train the dataset and create a model. Replace <TOKEN> with your JWT token and <DATASET_ID> with ID of the dataset you created cURL
  The response looks like this JSON.
 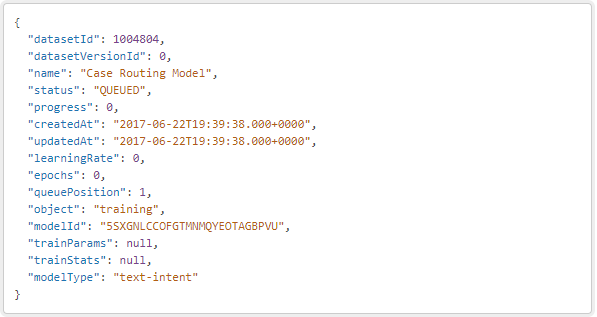 Use the modelId to make this call and get the training status. Replace<TOKEN> with your JWT token and MODEL_ID with the ID of the model you created. Curl
  The training status response looks like this JSON. The status of SUCCEEDED means that the model is ready for predictions.
  Step 4: Send text for prediction Now your model is ready!
To test it out, send some text in for prediction. This cURL call takes the modelId of the model from which you want to return a prediction and the text string to analyse. Replace <TOKEN> with your JWT token and <MODEL_ID> with the ID of your model. Curl  The response looks like this JSON.
 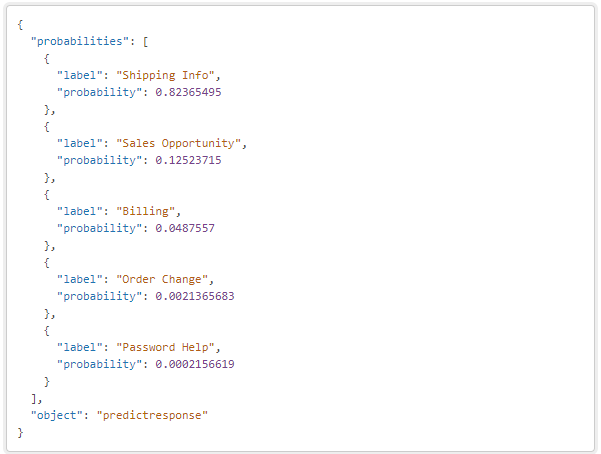 The model predicts that the text indicates that the user has a comment or question about shipping, so the model returns Shipping Info as the top probability.
Your app can then use this information to route the case to the right department or agent.
You can easily use model Id <MODEL_ID> of your model in the Apex code that you have created earlier by the name of ‘visionController’ to see the intent prediction directly from visualforce page just by making this simple change: Apex Code: 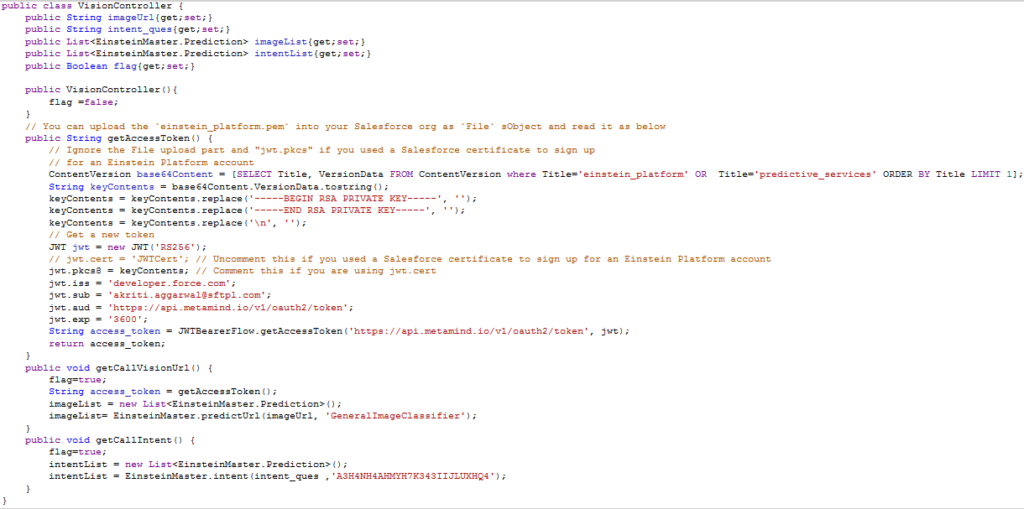 Here my Model Id is: A3H4NH4AHMYH7K343IIJLUXHQ4
You can use the same to see the prediction. VF: 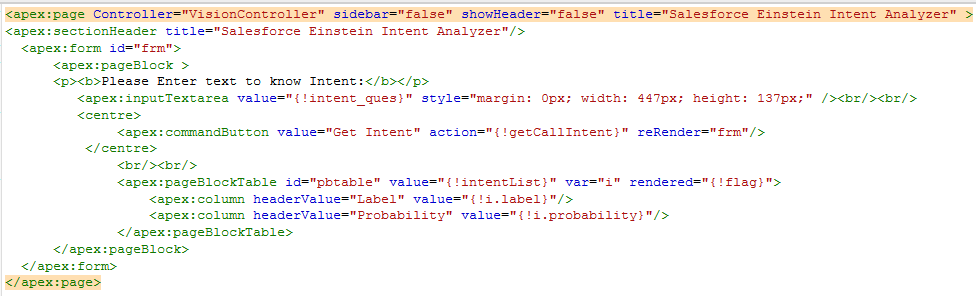 Prediction:
 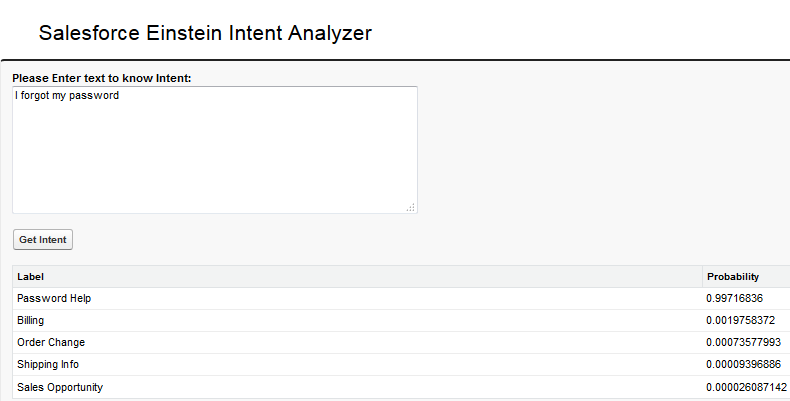 So, given the importance of this awesome feature, you are good to go with Salesforce Einstein Vision. I hope we can start a new discussion about it together. If you have any questions please leave a comment below.